
SellCarAdvisor is reader-supported, when you sign up through links on this post, we may receive compensation at no extra cost to you. How We Work.
The bottom line: You don’t need to be a mechanic to spot car trouble. By tuning into your senses, you can identify most problems early. Listen for odd sounds, check for warning lights, and notice any unusual smells or vibrations.
Catching problems early matters. Repair costs have risen in recent years, so the sooner you spot a problem, the less it tends to cost to fix.
Key Takeaways
- Most car problems announce themselves through sounds, smells, vibrations, or visual clues you can spot without any mechanical knowledge.
- Warning light colors tell you urgency level: red means stop immediately, yellow means schedule a checkup soon.
- Fluid leaks have distinct colors that point to the system that’s leaking. Brown or black is engine oil, green or pink is coolant, and clear with a sharp smell is usually brake fluid.
- The DIY line is simple: fluid checks, tire pressure, and visual inspections are safe for anyone, but brakes, steering, and electrical work need a professional.
- A basic 5-minute weekly check can catch most developing problems before they turn into expensive repairs or a roadside breakdown.
- If you have a check engine light, a free OBD scan at any auto parts store gives you the actual fault code in minutes and is the fastest first step.
- When repair estimates consistently exceed your car’s value, selling may be the smarter move than fixing.
Compare Instant Offers
The Fastest Way to Identify a Car Problem
If your check engine light is on, skip straight to this step. Every car made after 1996 has an OBD-II port under the dashboard. When a warning light triggers, the car stores a fault code in that port that tells you exactly what system flagged the problem.
You have two ways to read it for free or nearly free:
- Free in-store scan: AutoZone, O’Reilly Auto Parts, and Advance Auto Parts all offer free OBD scans. Drive in, tell them your check engine light is on, and they’ll plug in a reader and print out the codes. The whole thing takes about 5 minutes.
- Home OBD-II reader: Bluetooth OBD-II adapters cost $10 to $50 on Amazon. They pair with a free app on your phone (like Torque or OBD Auto Doctor) and let you read and clear codes yourself any time.
A fault code like “P0420” or “P0300” points to a specific system. You can search the code online or ask the parts store staff what it means. This one step turns a mystery warning light into a named problem you can research or quote out.
For problems that don’t trigger a warning light, your senses are still the best tool. The sections below cover what to listen for, look for, feel, and smell.
What Your Car’s Warning Signals Mean?
Modern vehicles contain between 60 to 100 sensors monitoring everything from engine performance to tire pressure. These systems are designed to alert you before small problems become expensive ones.
Yet many drivers continue driving after a warning light appears, making dashboard warnings among the most commonly ignored signals a car sends.
Let’s break down how to use your basic senses to identify problems, without requiring any technical knowledge.
Learn more: 20 Most Common Car Mechanical Issues (Solutions & Costs)
Listen: What Those Car Sounds Are Telling You
Different sounds point to specific problems, and each has its own urgency level:
| Sound | What It Means | Urgency | DIY Check |
|---|---|---|---|
| Knocking or tapping | Engine issue, possibly fuel octane or internal parts | Medium-High | Try correct fuel grade first; if persists, see mechanic |
| Grinding when braking | Worn brake pads | URGENT | Have brakes inspected immediately |
| High-pitched squealing | Belt issues | Medium-High | Visual check for cracked/frayed belts |
| Rhythmic clicking when turning | CV joint problems | Medium | Have checked if noise increases during turns |
| Hissing after shutdown | Cooling system pressure/leak | Medium | Check coolant level when cool |
| Rattling underneath | Loose exhaust components | Medium | Visual check for dangling parts |
Engine Knocking or Tapping
Don’t ignore a knocking sound. It can reduce engine life by 20 to 70% in some cases if left unaddressed.
Sound example:
How to check for gasoline engines: If the sound gets louder when accelerating, first try using the fuel grade recommended in your owner’s manual (check the “Fuel” section). Many cars run fine on regular, but some require mid-grade or premium fuel.
For diesel engines: Knocking sounds in diesel engines are different from gasoline engines. If you hear a loud knocking or rattling in a diesel engine, especially when cold, have a professional check it.
Diesel engines normally make more noise than gasoline engines, but an unusual or sudden increase in noise should be investigated.
Grinding When Braking
That metal-on-metal sound means your brake pads are completely worn out.
Sound example:
How to check: If you hear grinding, don’t wait. Have your brakes inspected immediately. This is a safety issue that affects your ability to stop safely.
High-Pitched Squealing
A squealing noise, especially when starting your car or accelerating, typically indicates a problem with one of your car’s belt systems.
Sound example:
For cars with belts (most vehicles): Most modern cars use a serpentine belt that drives multiple components including the alternator, power steering pump, and air conditioning. If it breaks, you’re instantly stranded.
How to check a belt safely: With the engine OFF and COOL:
- Open your hood (usually by pulling a lever near the driver’s floor area, then releasing a safety catch under the front edge of the hood)
- Locate the long, black, ribbed belt at the front of the engine (it loops around several pulleys)
- Without touching anything else, visually inspect this belt. Look for:
- Visible cracks across the ribs
- Shiny, glazed patches
- Fraying along the edges
- Missing chunks of rubber
A good belt should have clear ribs with no cracks. If you’re unsure what you’re looking at, take a photo with your phone and show it to a mechanic or auto parts store employee.
For vehicles with timing chains instead of belts: Some vehicles use timing chains inside the engine rather than external belts. If you have a timing chain and hear squealing, it’s likely from accessory belts or pulleys.
Have a mechanic check it, as timing chain issues usually make more of a rattling noise and require professional diagnosis.
Rhythmic Clicking When Turning
This sound, especially during sharp turns, usually indicates a problem with your car’s CV (constant velocity) joints, which connect the transmission to the wheels in front-wheel-drive vehicles.
CV joint failures typically announce themselves with clicking sounds before complete failure.
Sound example:
How to check: Listen for clicking sounds that get louder during sharper turns. If you hear them, have your CV joints inspected soon. This is something a mechanic needs to address, as it requires special tools and expertise.
Look: Visual Inspection Basics
You don’t need mechanical expertise to spot many problems. Just your eyes and a bit of knowledge.
| Visual Sign | What It Means | Urgency | Action Needed |
|---|---|---|---|
| Red warning light | Critical system failure | URGENT | Check manual, address immediately |
| Yellow warning light | System requires attention | Medium | Have checked soon, refer to manual |
| Brown/black fluid under car | Engine oil leak | Medium-High | Check oil level, look for source |
| Red/brown fluid | Transmission or power steering leak | Medium-High | Check fluid levels, inspect for source |
| Green/yellow/pink fluid | Coolant leak | High | Check coolant level when cool |
| Clear fluid with brake smell | Brake fluid leak | URGENT | Have inspected immediately |
| Tire wear on edges only | Underinflation | Medium | Check and adjust tire pressure |
| Tire wear in center only | Overinflation | Medium | Check and adjust tire pressure |
| Uneven tire wear on one side | Alignment issues | Medium | Schedule alignment service |
Dashboard Warning Lights
Those illuminated symbols aren’t just decorations. They’re communications from your car’s computer. The most important warning lights to know:
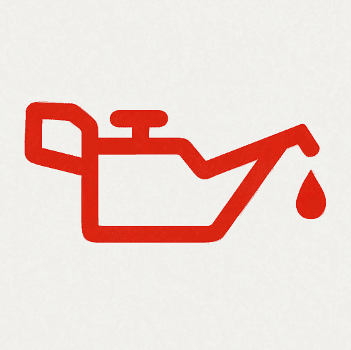
- Red oil can (oil pressure): Stop immediately and shut off the engine. Driving with low oil pressure can destroy your engine in minutes.
- Red brake warning: Stop as soon as safely possible. This could indicate a serious brake system failure.

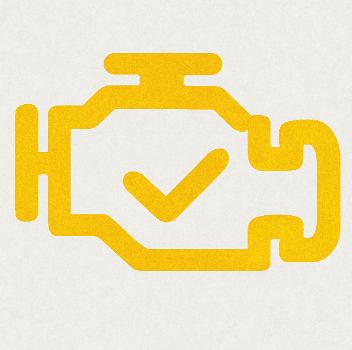
- Yellow check engine: Have your vehicle serviced soon. While not usually an emergency, ignoring it can lead to damage and higher repair costs.
- Blue/green temperature gauge in the red zone: Check coolant level and look for leaks. Overheating can cause severe engine damage.

Your owner’s manual explains all the warning lights specific to your vehicle. It’s worth reviewing this section now, before warning lights appear.
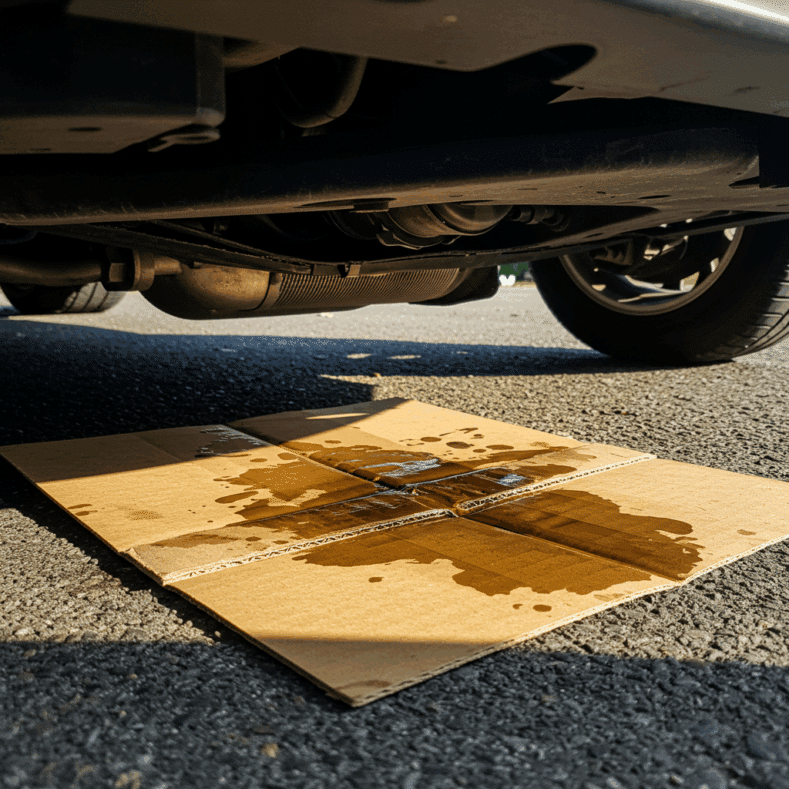
Fluid Leaks and Their Colors
Finding a puddle under your car can tell you a lot about what’s leaking:
- Brown/black: Engine oil. Check your oil level and look for leaks around the oil filter or oil pan.
- Red/brown: Transmission fluid. Typically leaks near the center of the vehicle.
- Green/yellow/pink: Coolant/antifreeze. Check around the radiator, hoses, and reservoir.
- Clear to light brown: Brake fluid. A safety issue that needs immediate attention.
- Clear water: Normal A/C condensation (not a concern). This typically only happens when the A/C is running.
How to check: Place cardboard or newspaper under your parked car overnight, then note the color and location of any spots. Take a photo of significant leaks to show your mechanic.
Tire Tread Depth
Worn tires greatly affect your ability to stop, especially in wet conditions. The legal minimum tread depth is 2/32″, but safety experts recommend replacement at 4/32″.
How to check: Insert a quarter into the tread groove with Washington’s head upside down. If you can see the top of Washington’s head, your tires have less than 4/32″ remaining and should be replaced soon for safety.
Check multiple spots across each tire, as uneven wear is common.
Uneven Tire Wear
The pattern of wear on your tires can identify specific problems:
- Center wear (middle of tire more worn): Overinflation. Reduce tire pressure to manufacturer’s specifications.
- Edge wear (sides of tire more worn): Underinflation. Increase tire pressure to proper level.
- One-sided wear (inner or outer edge worn): Alignment issues. A professional alignment is needed.
- Cupping (spots of uneven wear): Suspension problems. Have shocks/struts inspected.
Feel: Detecting Problems Through Driving Experience
Your car’s handling problems speak volumes about what’s going wrong.
| Sensation | Likely Cause | Urgency | DIY Check |
|---|---|---|---|
| Steering wheel vibration at highway speeds | Tire imbalance or alignment | Medium | Note when vibration occurs – worse at certain speeds? |
| Vibration during braking | Warped brake rotors | Medium-High | Pay attention if worse at specific speeds |
| Car pulls to one side | Alignment issue or tire pressure | Medium | Check tire pressure, test on level road |
| Bouncy/harsh ride | Worn shocks/struts | Medium | Push down on each corner – car shouldn’t bounce more than 1 to 2 times |
| Spongy brake pedal | Air in brake lines or fluid leak | URGENT | Check for brake fluid leaks, have inspected |
| Delayed response when accelerating | Transmission issues | Medium-High | Note if worse when cold or hot |
Steering Wheel Vibrations
A shaking steering wheel usually indicates an imbalance somewhere in the system. Tire and wheel issues are the most common cause, while a smaller percentage of cases point to brake problems.
How to diagnose: Notice when the vibration occurs:
- At higher speeds (50+ mph): Likely tire imbalance or alignment issues
- During braking: Probably warped brake rotors (the metal discs that brake pads clamp onto)
- At all speeds: Could be wheel alignment or suspension issues
Pulling to One Side
If you feel your car drifting left or right when the road is straight, your wheel alignment is likely off. Misalignment causes tires to wear faster and reduces fuel efficiency a lot.
How to check: On a straight, level road with no traffic, briefly (and carefully) release your grip slightly on the steering wheel. If the car immediately veers left or right, you need an alignment.
This isn’t something you can fix yourself. You’ll need to visit an alignment shop.
Bouncy or Harsh Ride
If your car bounces a lot after bumps or feels unusually harsh over rough roads, your shock absorbers or struts may be worn out. Vehicles with worn shocks have much longer stopping distances.
How to check: Push down hard on each corner of your car and release. If the car bounces more than once or twice, your shocks are likely worn.
Also, if you notice oil leaking from the shock absorbers (the cylinder-shaped components at each wheel), they definitely need replacement.
Smell: Odors That Indicate Specific Problems
Your nose knows when something’s wrong.
| Smell | What It Indicates | Urgency | Action Needed |
|---|---|---|---|
| Burning rubber | Belt slipping or hose touching hot parts | High | Check for visible rubbing, melting |
| Burning oil | Oil leak on hot components | Medium-High | Check for oil leaks, check oil level |
| Sweet, syrupy odor | Coolant/antifreeze leak | High | Check coolant level, look for leaks |
| Rotten egg/sulfur | Failing catalytic converter | Medium | Have emissions system checked |
| Persistent fuel smell | Fuel system leak | URGENT | Look for leaks, have inspected immediately |
| Burning carpet/hair | Overheating brakes or clutch | Medium-High | Let components cool, check for dragging brakes |
| Electrical burning | Wiring problems | URGENT | Check for hot/damaged wires, blown fuses |
Burning Smells
Different burning odors indicate specific issues:
- Burning rubber: Could be a slipping belt or hose touching hot engine parts. Look for signs of rubbing or melting under the hood.
- Hot oil smell: Oil leaking onto hot engine components. Check for oil leaks around the valve cover and oil filter.
- Burning carpet smell: Overheating brakes or clutch. Allow your brakes to cool if you’ve been braking a lot.
- Electrical burning: Wiring problems that create a serious fire risk. Check for damaged wires or blown fuses right away.
Sweet, Syrupy Smell
That sweet smell isn’t a good thing. It’s leaking coolant (antifreeze). This glycol-based fluid has a distinctive sweet aroma and is key for preventing engine overheating.
Engine overheating due to coolant loss can cause permanent damage. Address a coolant leak as soon as you notice it.
How to check: Look for green, yellow, or pink fluid under your car or around the radiator and hoses. Also check the coolant reservoir (a plastic tank usually labeled “coolant” or “antifreeze”). It should be between the “min” and “max” lines when the engine is cool.
Rotten Egg Smell
That sulfur smell typically indicates a failing catalytic converter. This important emissions control device can cost $1,000 to $2,500 or more to replace, depending on your vehicle.
How to check: If the smell is strongest during acceleration or when the engine is working harder, have your emissions system checked. This requires specialized testing equipment and can’t be diagnosed at home.
Learn more: How to Sell a Car with Failed Emission Test? (Best Places)
Persistent Fuel Odor
While a brief smell of gasoline after refueling is normal, a persistent odor indicates a leak somewhere in the fuel system. Gasoline leaks create a serious fire risk and need immediate attention.
How to check: Look for wet spots or stains along fuel lines, near the gas tank, or around the engine. If you smell fuel regularly, have your car inspected by a professional right away.
When to DIY vs. When to Call Professionals
Knowing your limits is important when it comes to car repair. Most car owners can handle basic maintenance, but some repairs require specialist tools and knowledge.
Professional diagnostic fees typically run $75 to $125, but catching a problem early can save much more in the long run. Tools like RepairPal’s repair estimator can give you a realistic cost range before you visit a shop.
Safe for Most DIYers
- Checking fluid levels (oil, coolant, washer fluid)
- Inspecting tires and checking tire pressure with a gauge
- Replacing air filters (both engine and cabin). Your owner’s manual shows locations.
- Changing wiper blades. Many auto parts stores will install these for free.
- Basic visual inspections: looking for obvious damage or leaks
Leave to the Professionals
- Brake system repairs: a safety-critical system with hydraulic components
- Steering system issues: affects vehicle control
- Transmission problems: complex system requiring special tools
- Electrical system diagnostics: requires testing equipment and expertise. See our guide on selling a car with electrical issues if repairs aren’t worth it.
- Engine internal repairs: requires specialized tools and knowledge
Learn more: When is it Not Worth Repairing a Car? (Sell vs Fix)
Creating a Simple Problem Identification Routine
A consistent inspection routine catches most developing problems before they cause breakdowns.
Weekly Quick Check (5 minutes)
- Walk around your car looking for obvious issues (damaged lights, low tires)
- Check for new fluid spots under the car after parking overnight
- Listen for unusual sounds during startup and initial driving
- Pay attention to how the car feels while driving (pulling, vibrations)
Monthly Inspection (15 minutes)
- Check all fluid levels:
- Oil: With engine off and car on level ground, pull dipstick (usually has a brightly colored loop handle), wipe clean with paper towel, reinsert fully, then pull out again to check level between the “min” and “max” marks
- Coolant: With engine COLD, check level in transparent reservoir (plastic tank with colored liquid) between min/max lines
- Brake fluid: Check level in reservoir under hood (usually near the driver’s side firewall, with a cap labeled “BRAKE”)
- Power steering: Check reservoir level (if applicable)
- Washer fluid: Top up if low (blue cap with windshield or spray symbol)
- Inspect tire tread and pressure with a proper tire gauge (check the driver’s door jamb for correct PSI)
- Test all lights (headlights, brake lights, turn signals). You may need a friend to help check brake lights.
Simple Visual Check Anyone Can Do (No Technical Knowledge Required)
When your hood is open for checking fluids, take 30 seconds to do this simple visual inspection that could save you from a breakdown:
- Battery check: Look at your battery terminals (where cables connect to the battery). Do they have fuzzy white, blue, or green stuff on them? That’s corrosion and it needs cleaning.
- Hose quick-check: Without touching anything on a hot engine, just look at the rubber hoses. Are any obviously cracked, bulging, or leaking fluid? If yes, have those checked.
- Belt quick-check: Look at any visible black rubber belts. Do you see any that are obviously frayed (like old rope) or with pieces missing? If yes, have them checked.
This isn’t about becoming a mechanic. It’s just noticing obvious problems anyone can spot, like noticing a hole in your clothes. When in doubt, take a photo and show it to a mechanic.
Seasonal Check (Spring and Fall)
- Test battery: Many auto parts stores offer free battery testing. Just drive in and ask.
- Inspect wipers and replace if they leave streaks or skip. Most auto parts stores will install new wipers for free.
- Check coolant protection: Most quick oil change places will check your coolant protection level for free during an oil change.
- Visual inspection of belts and hoses: When getting an oil change, ask the technician to check your belts and hoses. Most places do this automatically.
If you’re comfortable with basic car maintenance and want to check coolant strength yourself:
- Purchase an inexpensive coolant tester (looks like a turkey baster with markings) from any auto parts store
- With a COOL engine, carefully remove the radiator cap or coolant reservoir cap
- Use the tester to draw up some coolant and read the protection level on the scale
- The coolant should protect to at least -34°F (-36°C) for winter protection
Translating Problems to Solutions
When you identify a problem, understanding the urgency and likely costs helps you make informed decisions.
| Problem Category | Timeframe for Repair | Example Issues | Potential Consequences of Delay |
|---|---|---|---|
| URGENT | Same day | • Brake failure • Engine overheating • Oil pressure warning • Fuel leaks | Major safety risk, catastrophic damage, stranded |
| VERY SOON | Within 3 days | • Grinding brakes • Battery/charging issues • Engine misfiring • Coolant leaks | Likely breakdown, repair costs go up fast |
| SOON | Within 2 weeks | • Check engine light • Minor fluid leaks • Alignment issues • Unusual noises | Performance issues, increasing damage, reduced efficiency |
| MAINTENANCE | Within 1 month | • Worn wipers • Air filter replacement • Oil change needed • Tire rotation | Gradual wear, minor efficiency loss, future problems |
Many common car repairs can be done within a day, and catching problems early can cut your repair costs a lot.
Preventing Future Problems
The best way to avoid car trouble is preventing it in the first place.
| Maintenance Item | Typical Interval | Benefit | DIY or Professional? |
|---|---|---|---|
| Oil change | 3,000 to 10,000 miles | Extends engine life by up to 50% | Both (DIY if comfortable) |
| Tire rotation | 5,000 to 7,500 miles | Extends tire life by 20% | Professional (often free with tire purchase) |
| Air filter | 15,000 to 30,000 miles | Improves fuel economy, engine performance | DIY (easy) |
| Transmission fluid | 30,000 to 60,000 miles | Can double transmission life | Professional |
| Brake fluid | Every 2 to 3 years | Prevents brake system damage, ensures safety | Professional |
| Coolant flush | Every 2 to 5 years | Prevents corrosion, overheating | Professional |
| Timing belt | 60,000 to 100,000 miles | Prevents catastrophic engine damage | Professional |
Regular maintenance can cut repair costs a lot in the long run. Properly maintained vehicles last an average of 5 years longer than poorly maintained ones.
Learn more: Car Maintenance Records – Should You Keep Them?
Resources for the Non-Mechanic
You don’t need to become a mechanic to identify car problems. Many resources can help:
- Your owner’s manual: the best source for information specific to your vehicle
- Manufacturer websites: offer specific maintenance schedules and information for your vehicle
- Mobile diagnostic apps with Bluetooth OBD-II readers cost $10 to $100 and can translate check engine codes
- YouTube tutorials: search your specific make, model, and year for visual guides
- AAA and other motoring organizations: provide free educational materials on vehicle maintenance
Taking time to learn basic car care builds confidence and reduces repair costs over time.
By paying attention to what you hear, feel, see, and smell, you’ll catch problems before they become expensive repairs. No mechanical expertise required.
Compare Instant Offers
Compare Instant Offers
Frequently Asked Questions About How to Identify Car Problems
What does a flashing check engine light mean?
A flashing or blinking check engine light is more serious than a steady one. It usually means an engine misfire is happening that could damage your catalytic converter within minutes of driving.
Pull over safely and avoid driving the car until a mechanic can check it. A steady yellow check engine light can wait a few days, but a flashing one shouldn’t.
How do I check if my car has any open safety recalls?
You can check your car’s recall status using your 17-digit VIN number. If your car has an open recall, the manufacturer is required to fix it at no charge to you.
It’s worth checking at least once a year, since recalls can be issued any time after a vehicle is sold.
Learn more: Check Your Car for Recalls, Safety Issues, and Complaints
Should I sell my car if it has transmission problems?
If a transmission repair estimate is close to or more than your car’s current value, selling is often the smarter move. Transmission repairs can run $1,500 to $4,000 or more depending on the vehicle.
Online car buyers do accept cars with transmission problems, so you can still get an offer even if the car won’t drive normally.
Learn more: How to Sell a Car with a Bad Transmission
When does a car become too expensive to keep repairing?
A common rule of thumb: if a single repair costs more than your car’s current market value, it’s time to consider moving on. If you’re facing multiple big repairs at once, the math usually says the same thing.
The best first step is to know what your car is actually worth today. You can compare offers from multiple services with Sell Car Advisor in minutes to find out, even if the car has problems.
Our repair-or-sell guide covers how to weigh these decisions in detail.

Article Update History
Catalytic converter replacement costs verified against current repair data. Added a dedicated section on free OBD scans at auto parts stores, the fastest way to identify what's wrong before deciding whether to fix or sell.
Originally posted and shared with our readers.